
I promised to write a tute on EQ7 and got few requests about designing PP patterns. As it was also a problem for me (you couldn't really find any video or tute on how to make PP blocks in EQ) I will share what I know (it's not much, as I just started to use the program, but may be helpful for some of you).
It will be a long post, there are lots of photos, but I thought that using photos will make it easier for you. If you will have any questions about the tute - ask. I will later update the post with the answers.
Post jest o projektowaniu wzorow PP w programie Electric Quilt. Nie ma tu zasad, jak projektowac wzory PP, tylko samo wykorzystanie programu - sama mialam z tym problemy, bo to jest jedna z tych fiunkcji, o ktorej chyba nikt nie pomyslal, zeby zrobic szczegolowy tutek czy video. Dowiadywalam sie przez biuro obslugi co i jak. Polska wersje napisze, jesli komus bedzie potrzebna (nie chcialam mieszac z tlumaczeniem przy tak dlugasnym poscie). Jesli chcecie - piszcie :)
Important note - this tute is for those who now how to design paper piecing (foundation piecing) patterns, know the rules of PP but had dificulties on designing them in EQ7. I also show in details how to design PP pattern basing on the picture (if you don't want to use picture/photo as a template, just work in EasyDraw mode all the time). Honestly, EQ7 makes it much easier to design such pattern. It's just done before you can spell 'paper piecing' :D:D
First you need to open a new project. Work on a New Block -> Easy Draw Block:

Switch the tabs on the botton from EasyDraw to (1) Tracing Image (if you want to use an image as a template, as I always do), then import a photo which you want to use (2):

Browse the pictures you have on PC (I used a pre-drawn PP pattern which I designed ages ago, but it was much easier to make a tute basing on it; the pattern itself is poorly drawn, not really good for PP, but enough for showing all the steps):
If you want, you can trim the picture:

Now your image is in the background:

Switch the tabs from 'Tracing Image' to 'EasyDraw'. Set the finished block size (width and height) you want to create:
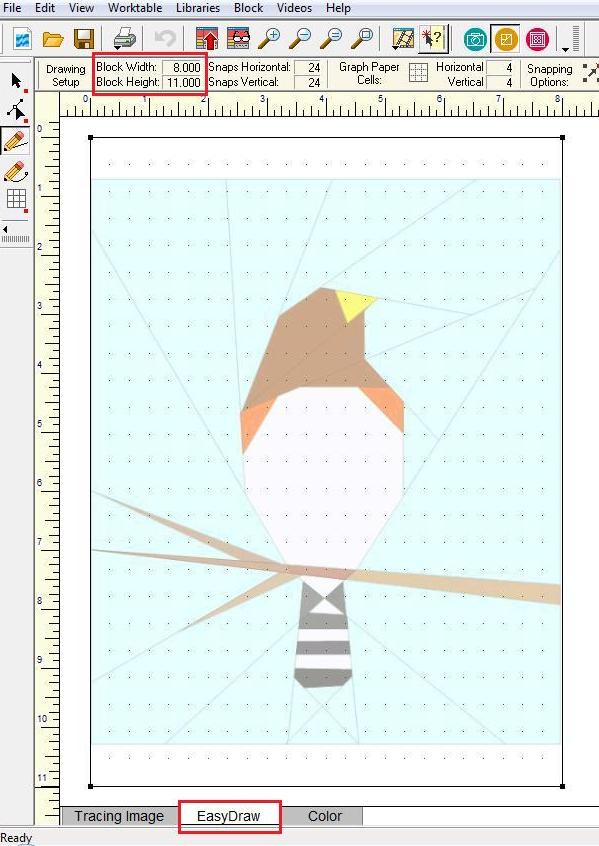
I was setting mine to 6x8in:

Now click the 'Snap to the lines and arcs of drawing' tool (3). For me it's the best choice to draw PP patterns based on photos. Nr (1) is 'Snap to the grid points on worktable' [those dots which fill the block]. It's good for designing simple geometric PP blocks, as each end of the line which you draw will connect with the closest dot on the grid. Nr (2) is 'Snap to the nodes of drawing'. Those nodes which you created drawing a picture. You can use more that one tool at a time - I use mostly nr 3 and from time to time turn on nr 2:

Now drawing starts. Click on the icon with pencil (it depends which lines you want to draw - straight one or curves/arcs):

Draw lines of your PP block [for this you need to know the basics of designing PP blocks]:

When you are finished:

You can colour your image. Change the tab below from 'EasyDraw' to 'Color' and choose colors or fabrics to fill your block:

Now pattern can be printed. Printer icon -> Foundation pattern:

You will see a new window. There are 3 tabs on the top: Numbering, Sections and Options.

First choose sections on your block. Tab -> Sections -> Start Over [if you want EQ to divide your project into sections, leave the box unticked; I like to choose sections on my own]. 'Start Over' to start choosing parts of the first section:

When you marked the parts (by clicking on them) which you want to be in one section, click 'Group':

And start clicking on the parts which should belong to next section [don't press 'Start Over' now, as it will erase all what you marked up to now] -> Group, and so on until you chose all sections. You can see, that the group which you marked previously is now outlined with thicker blue line:

After finishing with sections, it's time for numbering the parts. Change the tab from 'Sections' to 'Numbering':

Click 'Add Numbers' button, and start clicking the parts in the sections. The first piece you will click (in each section) will have number 1, next - 2, and so on. They will also have letter according to the section which they belong to:


After finishing with this step, it's time to set options for the printout. Change the tab from 'Numbering' to 'Options' and set the size of the block which you want to print and click 'Preview' to see how the printout will look (you have to arrange the parts on the printout now]:

What you will see on the preview will be a group of parts one on the others. You have to arrange them evenly on the pages. Click 'Move' button (sorry for the bad printscreen):

Now, when you click on the part, it will change the colour to red and you can move it between the pages of the printout:

After you finished, just hit 'Print' button and you have a ready template for your PP block:

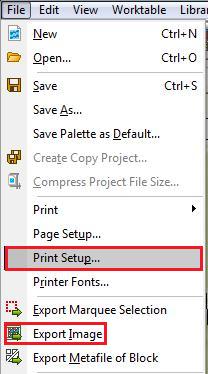
Originally, you can't save foundation piecing templates as pdf or actually any other kind of file. You can just print them and that's it. What you can make is to install some free pdf printer on your PC [there are many available in the net; I use pdf creator]. If you have a virtual pdf printer, after finishing drawing and coloring the block change printer setup. File -> Print setup -> choose the pdf printer instead of your home printer. This way, instead of printed pages at the end, you will have a pdf file with your sections.
What you can also do is to export an image [the coloured block] as jpeg. File -> Export Image -> save image where you want and how you want it:
It result in having a crisp image like this:

You can also export Metafile of block, but I will not write about it here, as you have very nice tutes on it HERE and HERE.
Ufff, that was a long post. Hope you are still awake ;) and it helped you a bit.
Any questions? Help? Just ask!

I don't own EQ7 or any EQ for that matter, but that sure looks like fun.
ReplyDeleteThank you SO much for taking the time to do this. I am going to print it out and try it. I think it might make it easier for me than using Photoshop which is what i have been doing. But I couldn't figure it out in EQ. Thank you.
ReplyDeleteThis is fantastic. I just got EQ7 for Christmas, and my goal is to learn to use it. I have read post after post from people who HAVE EQ7, but don't understand how to use it. I would love so to see many more blog posts on how to use EQ7's capabilities. Even the simple ones.
ReplyDeletethanks for sharing I see I have a lot to learn about EQ7
ReplyDeletethanks for sharing I see I have a lot to learn about EQ7
ReplyDeleteOh my goodness gracious me, this looks brilliant. You are a genius and I will be trying this, maybe even today,
ReplyDeleteThank you sooooooooo much - I will try it on my EQ7 later. I'm not good at my EQ7 so all help is great.
ReplyDeleteHappy new year :-)
Thanks a bunch! I also ^ am not very good with EQ. I'm sure it will take me the rest of my life to figure it out, lol. With kind, intelegent people, like you, in blog land I'm sure to get there a little quicker.
ReplyDeleteI love your PP patterns. I love wildlife and your little foxes and such are so whimsically adorable :o)
Thank you for this tutorial! I have an idea to do PP airplanes for my husband and daughter. They are both pilots. It will not be a short term project, but I WILL send pictures! Thanks again!
ReplyDeleteŚwietny tutek:) Od razu chciałoby się coś stworzyć w tym programie. Marzę o nim:)
ReplyDeletenajfajniejsze w tym programie jest to, że do wykroju można przypasować tkaniny w różnych konfiguracjach, tak by wybrać najlepszą.
That is great! I fear I have to upgrade my EG5 and give designing blocks a new try :)
ReplyDeleteThanks!
Susanne
Thank-you Joanna! I just got a copy of EQ7 and this was super helpful to draw my first pp block! :)
ReplyDeleteI've got a silly question - can you also add a symbol as a color code? I saw where you numbered it but not where you designated a color.
ReplyDeleteI'm considering purchasing EQ and am going to be doing a lot of pp designing.. :)
I got my answer - which is no, it doesn't :'( They said that they have never heard of such a thing as coding the paper piecing sections and it has never been an issue before. I'm kind of saddened. I really though it would be possible but after talking to their tech support, I'm the only one who thinks that paper pieced projects need to be coded for colors in each section :'(
DeleteHi,
DeleteI perfectly understand your need, I make my patterns in black and white and then add the symbols with a word processor (I use pages on my mac)
This tutorial is fabulous! Now, I have a question though - is there a way to save the foundation and template pieces when they're in teh print preview? I use EQ7 on a virtual PC on my mac and there is no printer linked with that, so I can't print, I need to email the files to myself and print from elsewhere, but i'm struggling to figure out how to do so.
ReplyDeleteJennifer,
ReplyDeleteSome PDF generators can act as a printer. When using one of these "printer drivers", it generates a PDF file. The following article lists a number of free options, with pros & cons:
http://www.techsupportalert.com/best-free-pdf-writer.htm
I don't know whether they all have printer drivers or not.
I am using an older version of PDFCreator (pre-adware), even though I do have a printer connected in Parallels. It allows me to print EQ templates, etc from OS X.
Hello, I love your excellent tutorial! I am excited to try this. I do have one question though, I designed a "stained glass" quilt that is currently appliqued by ironing on steam a seam, then the edges are covered with boas tape and stitched on both sides of the bias. But I would like to convert it to a paper piece pattern.
ReplyDeleteBut the quilt is 24" by 36".
http://annieofbluegables.blogspot.com/2012/08/my-latest-quilt.html
How would I design a quilt this big into smaller pieces? Is this just too big of a project for a paper piece pattern?
Thank You for a great tutorial. I tried it and am having an issue. As soon as I'm done and switch to the color tab part of my lines disappear. I'm not sure what I'm doing wrong. Thanks again for the tutorial.
ReplyDeleteTracie :)
Your tutorial is fantastic. I just used it to make a template of one of the Farmer's Wife 6 inch blocks. It turned out perfectly. Thank you!
ReplyDeleteWhat an excellent tutorial!! Thank you so much!!!
ReplyDeleteThanks for the tutorial I tried my own picture but when I press the foundation piecing it says one patch has an inside corner. I am not sure what an inside corner is or how to eliminate it. Any hints for me?
ReplyDeletethanks so much my dear, for this post. I had a Problem, even I use it quiet a lot in the last weeks and you solved it :)))))
ReplyDeleteI have a foundation pattern and I have the rest of the pattern written in Word...is there a way to copy the foundation pattern into Word so that it will print with the rest of my pattern?
ReplyDeletewow, great, I was wondering how to cure acne naturally. and found your site by google, learned a lot, now i’m a bit clear. I’ve bookmark your site and also add rss. keep us updated. lehigh valley web designer
ReplyDeleteLoved Loved your lesson. I was needing to convert a block to pp but had never done it before after trying to draw by myself several times and not coming out right I decided I better take some lessons. I cam across your and found it was so simple when tracing so than you very much and keep up the lessons.
ReplyDeleteHi Joanna,
ReplyDeleteWanted to send a thank you to you.. I've skimmed this tutorial many times, but never had a use for it until today. It helped me resolve the problem I was having versus how the EQ help file reads.. So I really appreciate this tutorial you created.
Thanks!!!!!!
ReplyDeletequiltinginamsterdam.blogspot.com
Thank you so much for taking the time to write this out! I just got EQ7 and can't wait to try this out!
ReplyDeleteThis was awesome. I kept your tutorial open as I drew in EQ7. I now have successfully imported, traced, drawn, segmented, numbered and printed. None of this would have been possible without you. Thanks a million.
ReplyDeleteHi I just wanted to thank you for writing this really clear and helpful tutorial!
ReplyDelete